<body><script type="text/javascript"> function setAttributeOnload(object, attribute, val) { if(window.addEventListener) { window.addEventListener('load', function(){ object[attribute] = val; }, false); } else { window.attachEvent('onload', function(){ object[attribute] = val; }); } } </script> <div id="navbar-iframe-container"></div> <script type="text/javascript" src="https://apis.google.com/js/platform.js"></script> <script type="text/javascript"> gapi.load("gapi.iframes:gapi.iframes.style.bubble", function() { if (gapi.iframes && gapi.iframes.getContext) { gapi.iframes.getContext().openChild({ url: 'https://www.blogger.com/navbar.g?targetBlogID\x3d13731209\x26blogName\x3dRock+Ruminations\x26publishMode\x3dPUBLISH_MODE_BLOGSPOT\x26navbarType\x3dBLUE\x26layoutType\x3dCLASSIC\x26searchRoot\x3dhttps://rockruminations.blogspot.com/search\x26blogLocale\x3den_US\x26v\x3d2\x26homepageUrl\x3dhttps://rockruminations.blogspot.com/\x26vt\x3d5897446297743788691', where: document.getElementById("navbar-iframe-container"), id: "navbar-iframe" }); } }); </script>

Rock Ruminations

"The Rock" - Newfoundland's nickname, attributed to the granite and rocky landcapes which wrap around coastlines of the province. It is an affectionate term towards Newfoundland, and highlights the significance of environment. Ruminations - the act of pondering; meditation.

Thursday, February 18, 2016

DIY Half Rack Plate Pegs

I own a Pro Half Rack by Fitness Gear that I purchase some time ago at Dick's Sporting Goods. As you will note from the image below, it has three pegs for plates on each side. They do not sell replacement or additional pegs at Dick's or anywhere else I was able to search online.


So I decided to build me own DIY plate pegs for my half rack.  I started with a two foot length of 1.5" PVC, along with two rubber stopper, four corner brackets, and some 4" screws and bolts.


The first job was to cut the PVC pipe into 6" lengths, as well as to cut the tops off of the rubber stoppers.


Second, I had to cut the corner braces because the length that I was attaching to the PVC pipe - as the plate wouldn't slide over both the PVC pipe and the brace.


I used bolt cutters to do this.  I could have used a hack saw, but this was just quicker.


I attached the corner brace to the PCV pipe using 1/4" bolts and nuts, and then slide the cut off rubber stopper ring over the pipe to project the plates from the metal edge of the corner brace.


I then took the top of the rubber stopper and, with a utility knife, cut the top of the stopper into a smaller circle.  This gave me something to slide into exposed hole of the PVC pipe.


Then I drilled holes into the half rack and attached the peg.


Note that initially I had used Phillips head screws - but Phillips head screws are useless and should be uninvented as far as I am concerned.  So after another trip to Home Depot I picked up some 4" hex bolts and used those instead.


Below you can see the finished product.


Wednesday, February 17, 2016

DIY Stability Ball Rack

So I have a bunch of stability balls, a bosu ball, and some medicine/slam balls that I need to store and came across some DIY ideas online, so I decided to give it a try.


I started with 14 two foot lengths of 1" PVC pipe, along with 7 tee joins and 4 corner joins.  I assembled 12 of the lengths, using 6 of the tee joins as pictured above.


I cut one of the remaining two foot lengths so that I was able to connect the two sides using a chop saw.  As you can see from the image below, I had to cut the four smaller ones twice because the gaps didn't match up once you pushed the PVC into the joins.


So I cut them again and assembled the rack.  The final result is pictured below.


Update: So one of the things that I noticed was that there wasn't much support in the rack in the middle of the top shelf.  Basically, another medicine/slam ball on the top and the middle would likely collapse.


So I went out and bought another length of two foot 1" PVC length and a cross join.  Basically, I moved the middle portion of the rack from the bottom to the top, and then used the cross join at the bottom.


So as you can see, the middle tee join that was on the bottom is at the top, which allows me to use the two foot length of pipe to prop up the top layer.  I had to cut the full length that was at the top initially into two smaller lengths to connect to the cross join at the bottom.  I will note that I did have to cut about a half inch off the bottom of the cross so that it was the same length.


But it seems to have turned out okay - much more stable.

Monday, February 15, 2016

DIY Fitness Projects

Okay, I know that I haven't really posted to this space in years - it may even be a decade at this point.  but I had a couple of items that I wanted to post somewhere and I didn't have any other place to post them that I thought was appropriate.

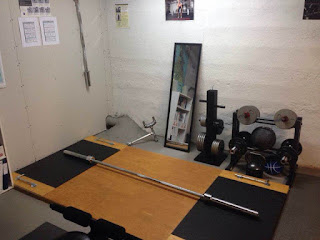
So over the past few months - maybe even year or so - I have been undertaking a couple of "do it yourself" or DIY projects that were fitness related.  The first, with the help of my father, was this deadlift platform.  Basically two sheets of 4'x8' plywood screwed together, then two quarters of a horse stall mat and a 4'x4' sheet of plywood - along with some 1"x4" pine and some gate latches (to attach bands).


The second project was this TRX-style system.  Basically it is a Gold's Gym Total Body Training System that is attached to the ceiling using a gate latch.


The third project was a homemade landmine that I made - attached to my half rack - using PVC pipe and a 6" bolt.


The final, initial, project was this tricep pulley system, that took a bit of work to get done.  Basically it is a couple of plastic/rubber wheels from Home Depot that were grooved out to allow a wire to run through it, with a D-link on each end for the attachment and the weight.


I say final, initial, project because over the next couple of days I will be posting detailed notes on two new DIY fitness projects.